Practical mastering IBM MQ basics
SSL/TLS configuration (3) client connection
*This series may be revised based on the latest mqpgf/mqpcf. Please always download and use the latest version.
So far, We've covered several times about setting up SSL/TLS for server-to-server connections, and then I'll show you how to use SSL/TLS for client connections.
Even when using SSL/TLS for client connection, operation with a self-signed certificate and one-way authentication (anonymous connection) are possible, but here, mutual authentication using a CA-signed certificate is explained as an example.
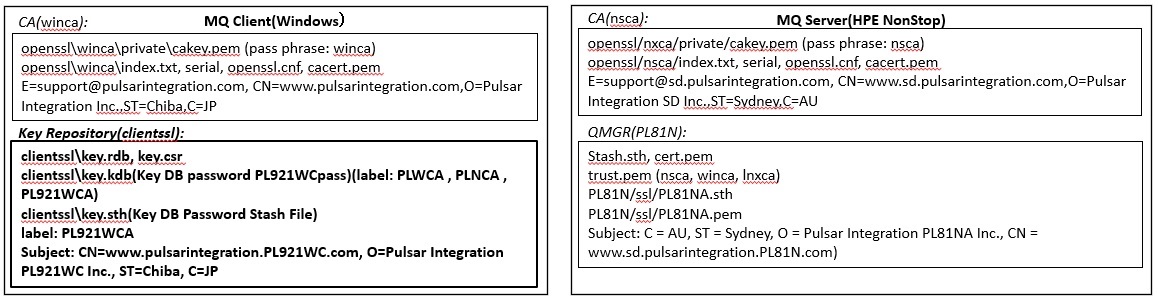
For client connection using SSL/TLS, you can use all the private CAs and key repositories created by server connection as they are, just by creating a channel for client connection.
The MQ client is also bundled with GSKit, and the procedure for creating a key repository is basically the same.
In the case of HPE NonStop, there is no single MQ client installation and it uses the MQ client features included in the MQ server, but the method of creating SSL/TLS related files is still basically the same.
However, MQ5.3.1 for HPE NonStop does not have MQ client functionality, so you must use MQ8.
Here, we will explain the case where only the MQ client is installed on a Windows machine as an example, but the procedure on Linux is also the same.
For the private CA on the MQ client (Windows) machine and the server, and the certificate setup on the server, the one created by the server-to-server connection is used as it is.
See the previous server-to-server connection instructions for instructions on creating them.
Also, the procedure for creating a key repository on the client side is the same as or similar to the procedure for connecting between servers, so detailed explanation may be omitted.
Also, if necessary, see the previous SSL/TLS setup instructions for server-to-server connections.
From this point onward, it is assumed that you can set up the basic MQ client connection configuration that does not use SSL/TLS by yourself, so if you are uncertain about that part, set it up by referring to the previous series.
SSL/TLS setup on the client (to create CSR) (GSKit)
*The procedure on the server side of this part is the same as the SSL/TLS setup for server-to-server connection, so refer to "SSL/TLS setup on each server (to create CSR) (GSKit)". For MQ8 for HPE NonStop, there is no standalone MQ client installation, but the MQ client bundled with the MQ server is used. Therefore, please refer to "SSL/TLS setup on each server (to create CSR) (Openssl)" on both the client side and the server side for setting up.
The MQ Client for Multiplatforms also uses the bundled GSKit (IBM Global Security Kit) for SSL/TLS libraries.
The procedure after this is verified with the following MQ client version.
An example of Linux is not shown, but it is basically the same as Windows.
| Windows |
9.2.1.0 |
GSKit commands used in SSL/TLS setup
The MQ client can use the strmqikm (iKeyman), runmqckm (iKeycmd), and runmqakm (GSKCapiCmd) commands as well as the MQ server. For details on each command, refer to "GSKit commands used in SSL/TLS setup" .
The following steps basically use the runmqckm command, similar to setting up a server-to-server connection, and use runmqakm only when creating a certificate request.
Prepare key repository for each client machine(Windows, Linux)
If the MQ environment is not set up in the login environment of each machine, set up the MQ environment.
*For Windows
> cd
*If "-s" is specified for setmqenv, the same installation environment as the executed setmqenv will be set among multiple MQ installation environments.
Create a key repository using the runmqckm command. For IBM MQ client, there is no default key repository location, so create it anywhere. I will explain later how to make the application refer to the key repository.
Decide where to place the repository, move it, and use the runmqckm command to create the key repository.
*The following is an example of Windows, but the same applies to Linux.
>*For Windows >cd ...\clientssl >runmqckm -keydb -create -db key.kdb -pw PL921WCpass -type cms -stash 5724-H72 (C) Copyright IBM Corp. 1994, 2020.
*Option descriptions
-keydb: The target of the command is the key database
-create: Create key database
-db filename: Specify the fully qualified file name of the CMS key database.
The file extension must be ".kdb".
-pw password: Specify the password for the CMS key database.
-type cms: Specifies the type of key database.
For IBM MQ, always specify cms (Certificate Management System).
-stash: Save the key database password to a file.
The following three files will be created.
>dir ... 2021/08/18 10:51 88 key.kdb 2021/08/18 10:51 80 key.rdb 2021/08/18 10:51 193 key.sth ...
See the SSL/TLS setup instructions for server-to-server connections for a brief description of these files.
About using CERTLAB L for client connections
CERTLABL can also be used with MQ client connections. MQ uses either the value if the CERTLABL attribute is set, or the default ibmwebspheremq with the name of the queue manager or the client user's logon ID in all lowercase letters. The procedure is described below using CERTLABL as an example.
Create Certificate Signing Request(CSR) (Windows, Linux)
A CSR (Certificate Signing Request) is a request to a CA to sign a server certificate.
When creating a CSR, use runmqakm instead of runmqckm if you want to use 2048 for the key size.
At that time, "-fips" is not specified.
*The following is an example of Windows, but the same applies to Linux, and it is specified in one line.
For DN, specify the contents for each server.
...\clientssl>runmqakm -certreq -create -db key.kdb -pw PL921WCpass -label PL921WCA -dn "CN=www.pulsarintegration.PL921WC.com,O=Pulsar Integration PL921WC Inc.,S=Chiba,C=JP" -size 2048 -file key.csr -sig_alg sha256 5724-H72 (C) Copyright IBM Corp. 1994, 2020.
*Option descriptions
-certreq: The target of the command is a certificate request
-create: Create a certificate request
-db filename: Specifies the fully qualified file name of a CMS key database.
-pw password: Specifies the password for the CMS key database.
-label label: Specifies the key label attached to the certificate.
The label is either the value of the CERTLABL attribute, if it is set, or the default ibmwebspheremq with the name of the queue manager all in lowercase.
-dn: distinguished_name: Specifies the X.500 distinguished name enclosed in double quotation marks.
At least one attribute is required.
-size key_size: Specifies the key size.
-file filename: Specifies the file name for the certificate request.
-sig_alg hashalgorithm: Specifies the hashing algorithm used during the creation of a certificate request.
This hashing algorithm is used to create the signature associated with the newly created certificate request.
A file with the extension ".csr" is created.
>dir ... 2021/08/18 13:42 1,046 key.csr 2021/08/18 10:51 88 key.kdb 2021/08/18 13:42 5,080 key.rdb 2021/08/18 10:51 193 key.sth
Make sure that the certificate request is created as expected.
...\clientssl>runmqckm -certreq -details -label PL921WCA -db key.kdb ... A password is required to access the source key database. Please enter a password: PL921WCpass Label: PL921WCA Key Size:2048 Subject: CN=www.pulsarintegration.PL921WC.com, O=Pulsar Integration PL921WC Inc., ST=Chiba, C=JP Fingerprint: 0D:59:74:D8:40:15:F1:A9:F1:5C:21:DE:38:F5:34:56 Signature Algorithm: SHA256withRSA (1.2.840.113549.1.1.11)
*Option descriptions
-certreq: The target of the command is a certificate request
-detail: Show the details of a specific certificate request
-label label: Specifies the key label attached to the certificate.
-db filename: Specifies the fully qualified file name of a CMS key database.
Issue a certificate at the Certificate Authority(CA) from the created certificate request(CSR)
This procedure is the same as when connecting between servers, so please also refer to the explanation of "Issue a certificate at the Certificate Authority (CA) from the created certificate request (CSR)".
>cd ...\openssl\winca >set PATH=%PATH%;C:\Program Files\OpenSSL-Win64\bin >set OPENSSL_CONF=...\openssl\winca\openssl.cnf >openssl ca -in ..\..\clientssl\key.csr Using configuration from ...\openssl\winca\openssl.cnf Enter pass phrase for .../openssl/winca/private/cakey.pem: winca Check that the request matches the signature Signature ok Certificate Details: Serial Number: 2 (0x2) Validity Not Before: Aug 18 06:28:07 2021 GMT Not After : Aug 16 06:28:07 2031 GMT Subject: countryName = JP stateOrProvinceName = Chiba organizationName = Pulsar Integration PL921WC Inc. commonName = www.pulsarintegration.PL921WC.com X509v3 extensions: X509v3 Basic Constraints: CA:FALSE Netscape Comment: OpenSSL Generated Certificate X509v3 Subject Key Identifier: 7D:E2:7B:D2:AC:62:DA:EC:43:2B:85:63:82:89:F0:98:D6:92:D7:5C X509v3 Authority Key Identifier: keyid:23:0B:5D:88:01:02:F5:6E:2B:F7:67:3D:67:A3:EF:AB:72:8D:43:A2 Certificate is to be certified until Aug 16 06:28:07 2031 GMT (3650 days) Sign the certificate? [y/n]:y 1 out of 1 certificate requests certified, commit? [y/n]y Write out database with 1 new entries Certificate: Data: Version: 3 (0x2) Serial Number: 2 (0x2) Signature Algorithm: sha256WithRSAEncryption Issuer: C=JP, ST=Chiba, O=Pulsar Integration Inc., CN=www.pulsarintegration.com/ emailAddress=support@pulsarintegration.com Validity Not Before: Aug 18 06:28:07 2021 GMT Not After : Aug 16 06:28:07 2031 GMT Subject: C=JP, ST=Chiba, O=Pulsar Integration PL921WC Inc., CN=www.pulsarintegration.PL921WC.com Subject Public Key Info: Public Key Algorithm: rsaEncryption RSA Public-Key: (2048 bit) Modulus: 00:ad:4e:4d:cc:35:25:c0:8b:50:54:9c:b9:e6:7b: .... Exponent: 65537 (0x10001) X509v3 extensions: X509v3 Basic Constraints: CA:FALSE Netscape Comment: OpenSSL Generated Certificate X509v3 Subject Key Identifier: 7D:E2:7B:D2:AC:62:DA:EC:43:2B:85:63:82:89:F0:98:D6:92:D7:5C X509v3 Authority Key Identifier: keyid:23:0B:5D:88:01:02:F5:6E:2B:F7:67:3D:67:A3:EF:AB:72:8D:43:A2 Signature Algorithm: sha256WithRSAEncryption 36:78:a6:58:ea:51:94:4c:7f:71:46:33:5e:c8:14:d6:66:b1: .... -----BEGIN CERTIFICATE----- MIID+zCCAuOgAwIBAgIBAjANBgkqhkiG9w0BAQsFADCBkTELMAkGA1UEBhMCSlAx .... adZngxtUb+U8XKBjCHEYXTNA/V96RK9kq260F RX0qLU69C6pBXa268cmq -----END CERTIFICATE----- Data Base Updated
*Option descriptions
ca: Performs basic CA functions and issues X.509 certificates and certificate revocation lists.
-in <filename>: Specify a certificate request (CSR) file.
A PEM file with the certificate serial number filename is created in the winca\newcerts directory. The issued certificate information is added to the index.txt file and the serial number in the serial file is incremented.
...\openssl\winca>dir newcerts .... 2021/08/04 15:44 4,721 01.pem 2021/08/18 15:28 4,728 02.pem .... >type index.txt V 310802064352Z 01 unknown /C=JP/ST=Chiba/O=Pulsar Integration PL92WA Inc./CN=www.pulsarintegration.PL92W.com V 310816062807Z 02 unknown /C=JP/ST=Chiba/O=Pulsar Integration PL921WC Inc./CN=www.pulsarintegration.PL921WC.com >type serial 03
Certificate verification
Please refer to the following to verify the certificate. See "Certificate Verification" for more information.
Check the symmetry of private and public keys
In the case of GSKit, only the public key is checked. Compare the hash values in each file and make sure they are all the same.
*CA signature certificate(server certificate) >openssl x509 -in newcerts\02.pem -modulus -noout | openssl md5 (stdin)= 2fd21828f14c785cb1350c141a6689b3 *Certificate request(CSR) >openssl req -in ..\..\clientssl\key.csr -modulus -noout | openssl md5 (stdin)= 2fd21828f14c785cb1350c141a6689b3
*Option descriptions
x509: Create, verify, and perform various other operations on X.509 certificates.
req: You can use this command to create, verify, operate certificate requests.
-in <filename>: File name to read.
-modulus: Output public key method (modulo).
-noout: Suppresses the output of the certificate in encoded form.
md5: Generate a message digest(hash value) using md5.
CA signing certificate and CA certificate subject and issuer check
Check the contents(subject and issuer) of CA-signed certificate(server certificate) and CA(root) certificate. "issuer" is the issuer of the certificate, both with the same CA Distinguished Name.
*CA signature certificate(server certificate) >openssl x509 -subject -issuer -noout -in newcerts\02.pem subject=C = JP, ST = Chiba, O = Pulsar Integration PL921WC Inc., CN = www.pulsarintegration.PL921WC.com issuer=C = JP, ST = Chiba, O = Pulsar Integration Inc., CN = www.pulsarintegration.com, emailAddress = support@pulsarintegration.com *CA(root) certificate >openssl x509 -subject -issuer -noout -in cacert.pem subject=C = JP, ST = Chiba, O = Pulsar Integration Inc., CN = www.pulsarintegration.com, emailAddress = support@pulsarintegration.com issuer=C = JP, ST = Chiba, O = Pulsar Integration Inc., CN = www.pulsarintegration.com, emailAddress = support@pulsarintegration.com
*Option descriptions
x509: Create, verify, and perform various other operations on X.509 certificates.
-subject: Output the certificate owner name.
-issuer: Output the issuer of the certificate.
-in <filename>: File name to read.
-noout: Suppresses
Verification of intermediate CA certificate or root certificate and server certificate
>openssl verify -CAfile cacert.pem newcerts\02.pem newcerts\02.pem: OK *It should be displayed as OK
*Option descriptions
verify: Verify the validity of the X.509 certificate.
Comprehensive checks are performed on the certificates, including validation on each certificate in the certificate chain.
-CAfile <filename1>: Specify the name of the trusted certificate file.
<filename2>: Specify the file name of the CA signing certificate to be verified.
Check the contents of the server certificate
Check that the expiration date and other contents of the server certificate are as expected.
openssl x509 -noout -text -in newcerts\02.pem
*Option descriptions
x509: Create, verify, and perform various other operations on X.509 certificates.
-noout: Suppresses the output of the certificate in encoded form.
-text: View the certificate in a readable format.
-in <filename>: File name to read.
Add CA(root) certificate to key repository(GSKit)
This procedure is the same as when connecting between servers, so refer to the explanation of "Add CA(root) certificate to key repository(GSKit)".
Go to the repository location and copy the root certificate to the repository location.
*If the certificates used for both sending and receiving channels are signed by different CAs, it is necessary to add both CA certificates on the server side as well.
>cd ...\clientssl *Added CA certificate for client(Windows) >runmqckm -cert -add -db key.kdb -pw PL921WCpass -label PLWCA -file cacert_win.pem -format ascii 5724-H72 (C) Copyright IBM Corp. 1994, 2020. *Add server CA certificate >runmqckm -cert -add -db key.kdb -pw PL921WCpass -label PLNCA -file cacert_ns.pem -format ascii 5724-H72 (C) Copyright IBM Corp. 1994, 2020. >
*Option descriptions
-cert: The target of the command is the certificate.
-add: Add CA certificate.
-db filename: Specify the fully qualified file name of the CMS key database.
-pw password: Specify the password for the CMS key database.
-label labelname: The label name to add to the certificate.
-file filename: The name of the certificate file.
-format ascii: Certificate format.
Specify Base64-encoded ASCII.
List the stored certificates.
...\clientssl>runmqckm -cert -list -db key.kdb -pw PL921WCpass 5724-H72 (C) Copyright IBM Corp. 1994, 2020. Certificates in database C:\ProgramData\IBM\MQ\qmgrs\PL92W\ssl\key.kdb: PLNCA PLWCA >
*Option descriptions
-cert: The target of the command is the certificate.
-list: List the certificates in the key database.
-db filename: Specify the fully qualified file name of the CMS key database.
-pw password: Specify the password for the CMS key database.
Display the details of each stored certificate.
>runmqckm -cert -details -label PLWCA -db key.kdb -pw PL921WCpass
>runmqckm -cert -details -label PLNCA -db key.kdb -pw PL921WCpass
*Option descriptions
-cert: The target of the command is the certificate.
-details: View specific certificate details.
-label labelname: The label name of the certificate.
-db filename: Specify the fully qualified file name of the CMS key database.
-pw password: Specify the password for the CMS key database.
Receive personal certificate to key repository(GSKit)
This procedure is the same as when connecting between servers, so refer to the explanation of "Receive personal certificate to key repository(GSKit)".
Add a CA-signed certificate(personal certificate) to the key repository for the client machine. Importing a personal certificate must always be in the key repository that created the CSR.
Add the personal certificate using the runmqckm command.
>cd ...\clientssl >copy ..\openssl\winca\newcerts\02.pem PL921WCA.pem >runmqckm -cert -receive -file PL921WCA.pem -db key.kdb -pw PL921WCpass -format ascii 5724-H72 (C) Copyright IBM Corp. 1994, 2020. Validation successful. >
*Option descriptions
-cert: The target of the command is the certificate.
-receive: Receive certificate.
-file filename: The name of the certificate file.
-db filename: Specify the fully qualified file name of the CMS key database.
-pw password: Specify the password for the CMS key database.
-format ascii: Certificate format.
Specify Base64-encoded ASCII.
Check the CA signing certificate you added on the key repository.
runmqckm -cert -list -db key.kdb -pw PL921WCpass
runmqckm -cert -details -label PL921WCA -db key.kdb -pw PL921WCpass
Testing a client connection using TLS(CCDT)
When using SSL/TLS for client connections, you cannot use the MQSERVER environment variable or the method of setting channel information in mqclient.ini.
You must either create a channel definition table (CCDT) or use the channel definition structure MQCD in MQCONNX call.
First, use the channel definition table (CCDT) to test the configuration of client connections using SSL/TLS.
Since it is assumed that CERTLABL / SNI will be used, it is necessary to specify the CipherSpec of "TLS".
Use TLS_AES_128_GCM_SHA256 as an example.
To define a TLS channel, simply specify CipherSpec in the channel property SSLCIPH and the certificate label in CERTLABL(if needed).
CipherSpec specifies the same value for the client connection channel (CLNTCONN) and the server connection channel (SVRCONN).
You do not need to consider the default label by the queue manager propertie CERTLABL, which was required for queue-manager-to-queue connections.
*Before configuring SSL/TLS, it is recommended to confirm the connection with a normal client connection.
Creating a server-side TLS connection definition
Create a server connection channel(SVRCONN) on the server side with the following command. In this example, CERTLABL uses the same label used for the server-to-server connection.
$ mqpcf mqsc -qm PL81N -s "def chl(PL81N.MQICHL) chltype(svrconn) certlabl(PL81NA) SSLCIPH(TLS_AES_128_GCM_SHA256)"
Creating a client-side TLS connection definition
For Windows, run the command prompt "Run as administrator" and start runmqsc with the "-n" option. If there are multiple installations, set up the MQ version environment used by setmqenv before executing it.
*When setting up the environment of the MQ version installed in "C:\Program Files\IBM\MQ_1". >"C:\Program Files\IBM\MQ_1\bin\setmqenv" -s >runmqsc -n 5724-H72 (C) Copyright IBM Corp. 1994, 2020. Starting local MQSC for 'AMQCLCHL.TAB'. MQSC > def chl(PL81N.MQICHL) chltype(clntconn) QMNAME(PL81N) certlabl(PL921WCA) SSLCIPH(TLS_AES_128_GCM_SHA256) CONNAME('xxx.xxx.xxx.xxx(xxxx)') 1 : def chl(PL81N.MQICHL) chltype(clntconn) QMNAME(PL81N) certlabl(PL921WCA) SSLCIPH(TLS_AES_128_GCM_SHA256) CONNAME('xxx.xxx.xxx.xxx(xxxx)') AMQ8014I: IBM MQ channel created.
By default, the channel definition is created in C:/ProgramData/IBM/MQ/AMQCLCHL.TAB. You can copy it to a location other than the default to prevent overwriting.
>dir C:\ProgramData\IBM\MQ\AMQCLCHL.TAB .... 2021/08/19 11:26 2,106 AMQCLCHL.TAB .... >copy C:\ProgramData\IBM\MQ\AMQCLCHL.TAB ....\clientssl
For client connections, the location of the key repository(the absolute path and the key repository file name without extension (default is "key")) must be specified in the MQSSLKEYR environment variable.
Specify the path of the CCDT file in the environment variable MQCHLLIB for reference to CCDT.
If the CCDT file has a file name other than the default file name AMQCLCHL.TAB, set the file name to the environment variable MQCHLTAB.
*If MQSERVER is set, it will be referenced preferentially, so delete it. >set MQSERVER= >set MQSSLKEYR=C:\...\clientssl\key >set MQCHLLIB=C:\...\clientssl
* The location of the key repository can also be specified using the -kr option.
In that case, it is necessary to specify with MQCNO_VERSION_4.
* When using the environment variable MQSSLKEYR, it is usually not necessary to specify MQCNO_VERSION_4, but when testing using Linux 9.2.4.0, it was necessary to specify MQCNO_VERSION_4 for some reason.
Ex. 12.1.1 Performing the Client Connection Using SSL/TLS(CCDT)
Execute the following command on the client to keep the client connection using TLS.
Define the queue in advance.
>mqpgfc -qm PL81N -q LQ1 -r MQGMO_WAIT MQWI_UNLIMITED
*Option descriptions
MQGMO_WAIT: Set MQGMO_WAIT in MQGMO.Options.
MQWI_UNLIMITED: Set MQGMO.WaitInterval to MQWI_UNLIMITED
Execute the following command on the server side and check the staus of the client connection with TLS.
$ mqpcf chs -qm PL81N -c PL81N.MQICHL SECPROT SSLCERTI SSLCIPH SSLPEER
1: CHANNEL(PL81N.MQICHL) CHLTYPE(SVRCONN) CONNAME(xxx.xxx.xxx.xxx) CHLINSTYPE(CURRENT) SECPROT(TLSV13) SSLCERTI(E=support@pulsarintegration.com,CN=www.pulsarintegration.com,O=Pulsar Integration Inc.,ST=Chiba,C=JP) SSLCIPH(TLS_AES_128_GCM_SHA256) SSLPEER(SERIALNUMBER=02,CN=www.pulsarintegration.PL921WC.com,O=Pulsar Integration PL921WC Inc.,ST=Chiba,C=JP) STATUS(RUNNING) STOPREQ(NO) SUBSTATE(RECEIVE) RAPPLTAG(C:\...\mqpgfc.exe)
*Option descriptions
chs: Display channel status.
SECPROT: Shows the security protocol currently in use.
SSLCERTI: Shows the fully distinguished name of the remote certificate issuer(CA).
SSLCIPH: Show CipherSpec used for the connection.
SSLPEER: Shows the distinguished name of the client on the other channel.
Testing a client connection using TLS(MQCD)
Next, test the connection using the channel definition structure (MQCD). Specify the certificate label and CipherSpec on the MQCD. To specify the certificate label (CertificateLabel), it is necessary to use MQCD version 11(MQCD_VERSION_11) or higher.
Ex. 12.2.1 Performing the Client Connection Using SSL/TLS(MQCD)
Environment variables other than MQSSLKEYR are unnecessary, so delete them. Create a client connection with specifying SSLCipherSpec and CertificateLabel by the following command.
>set MQSERVER=
>set MQCHLTAB=
>set MQCHLLIB=
>set MQSSLKEYR=C:\...\clientssl\key
>mqpgfc -qm PL81N -q LQ1 MQGMO_WAIT MQWI_UNLIMITED -x xxx.xxx.xxx.xxx(xxxx) -ch PL81N.MQICHL -cl PL921WCA -cs TLS_AES_128_GCM_SHA256 MQCD_VERSION_11
*Option descriptions
MQGMO_WAIT: Set MQGMO_WAIT in MQGMO.Options.
MQWI_UNLIMITED: Set MQGMO.WaitInterval to MQWI_UNLIMITED.
-x: Specify the connection name in MQCD.ConnectionName.
-ch: Specify the channel name in MQCD.ChannelName.
-cl: Specify the certificate label in MQCD.CertificateLabel.
-cs: Specify SSL/TLS CipherSpec in MQCD.SSLCipherSpec.
MQCD_VERSION_11: Specify MQCD_VERSION_11 for MQCD.Version.
Execute the following command on the server side and check the status of the client connection using TLS.
$ mqpcf chs -qm PL81N -c PL81N.MQICHL SECPROT SSLCERTI SSLCIPH SSLPEER
1: CHANNEL(PL81N.MQICHL) CHLTYPE(SVRCONN) CONNAME(xxx.xxx.xxx.xxx) CHLINSTYPE(CURRENT) SECPROT(TLSV13) SSLCERTI(E=support@pulsarintegration.com,CN=www.pulsarintegration.com,O=Pulsar Integration Inc.,ST=Chiba,C=JP) SSLCIPH(TLS_AES_128_GCM_SHA256) SSLPEER(SERIALNUMBER=02,CN=www.pulsarintegration.PL921WC.com,O=Pulsar Integration PL921WC Inc.,ST=Chiba,C=JP) STATUS(RUNNING) STOPREQ(NO) SUBSTATE(RECEIVE) RAPPLTAG(C:\...\mqpgfc.exe)
Confirmation of connection partner using SSLPEER
You can also allow only those with a specific DN to connect by specifying the DN of the other side in SSLPEER. SSLPEER can be set on both the server connection channel(SVRCONN) side and the client connection channel(CLNTCONN) side. Set a part or all of the DN of the other side in SSLPEER.
Ex. 12.3.1 Set SSLPEER on the server connection channel(SVRCONN) to limit who can connect.
The DN of the client-side(Windows) certificate is "SERIALNUMBER=02,CN=www.pulsarintegration.PL921WC.com,O=Pulsar Integration PL921WC Inc.,ST=Chiba,C=JP". Try setting a different DN "ST = Chiba, C = US" for the server-side channel.
$ mqpcf mqsc -qm PL81N -s "alter chl(PL81N.MQICHL) CHLTYPE(SVRCONN) SSLPEER('ST=Chiba,C=US')" 1: AMQ8016: IBM MQ channel changed. $ mqpcf chl -qm PL81N -c PL81N.MQICHL SSLPEER 1: CHANNEL(PL81N.MQICHL) CHLTYPE(SVRCONN) SSLPEER(ST=Chiba,C=US)
Try to make a connection.
>mqpgfc -qm PL81N -q LQ1 MQGMO_WAIT MQWI_UNLIMITED -x xxx.xxx.xxx.xxx(xxxx) -ch PL81N.MQICHL -cl PL921WCA -cs TLS_AES_128_GCM_SHA256 MQCD_VERSION_11 MQCONNX fail : PL81N CompCd=02 ReasonCd=2393 !!! Queue Manager Connect Fail PL81N !!! >mqrc 2393 2393 0x00000959 MQRC_SSL_INITIALIZATION_ERROR
In the server-side error log, you will see an error message explaining that the connection failed due to an SSLPEER DN mismatch.
AMQ9636: SSL distinguished name does not match peer name, channel 'PL81N.MQICHL'. EXPLANATION: The distinguished name, 'SERIALNUMBER=02,CN=www.pulsarintegration.PL921WC.com,O=Pulsar Integration PL921WC Inc.,ST=Chiba,C=JP', contained in the SSL certificate for the remote end of the channel does not match the local SSL peer name for channel 'PL81N.MQICHL'. The distinguished name at the remote host 'xxx.xxx.xxx.xxx' must match the peer name specified (which can be generic) before the channel can be started.
The DN of the client-side (Windows) certificate is "SERIALNUMBER=02,CN=www.pulsarintegration.PL921WC.com,O=Pulsar Integration PL921WC Inc.,ST=Chiba,C=JP". Next, try setting the string "CN=www.pulsarintegration.PL921WC.com,O=Pulsar Integration PL921WC Inc." that matches the DN of the client-side certificate to the server-side channel.
$ mqpcf mqsc -qm PL81N -s "alter chl(PL81N.MQICHL) CHLTYPE(SVRCONN) SSLPEER('CN= www.pulsarintegration.PL921WC.com,O=Pulsar Integration PL921WC Inc.')" 1: AMQ8016: IBM MQ channel changed. $ mqpcf chl -qm PL81N -c PL81N.MQICHL SSLPEER 1: CHANNEL(PL81N.MQICHL) CHLTYPE(SVRCONN) SSLPEER(CN=www.pulsarintegration.PL921WC.com,O= Pulsar Integration PL921WC Inc.)
Try to make a connection.
>mqpgfc -qm PL81N -q LQ1 MQGMO_WAIT MQWI_UNLIMITED -x xxx.xxx.xxx.xxx(xxxx) -ch PL81N.MQICHL -cl PL921WCA -cs TLS_AES_128_GCM_SHA256 MQCD_VERSION_11
You can connect without any problem.
$ mqpcf chs -qm PL81N -c PL81N.MQICHL SSLPEER
1: CHANNEL(PL81N.MQICHL) CHLTYPE(SVRCONN) CONNAME(xxx.xxx.xxx.xxx) CHLINSTYPE(CURRENT) SSLPEER(SERIALNUMBER=02,CN=www.pulsarintegration.PL921WC.com,O=Pulsar Integration PL921WC Inc.,ST=Chiba,C=JP) STATUS(RUNNING) STOPREQ(NO) SUBSTATE(RECEIVE) RAPPLTAG(C:\...\mqpgfc.exe)
Ex. 12.3.2 Set SSLPEER on the client connection channel(MQCD) to limit who can connect.
The DN of the server-side certificate is "C=AU, ST=Sydney, O=Pulsar Integration PL81NA Inc., CN=www.sd.pulsarintegration.PL81N.com". Try setting this in the MQCD.SSLPeerNamePtr, SSLPeerNameLength parameter by the client application(mqpgfc). Specify the DN character string with "-er", but if there are spaces in the character string, enclose it in double quotes ("). The order in which each element of the DN is specified is arbitrary.
>mqpgfc -qm PL81N -q LQ1 MQGMO_WAIT MQWI_UNLIMITED -x xxx.xxx.xxx.xxx(xxxx) -ch PL81N.MQICHL -cl PL921WCA -cs TLS_AES_128_GCM_SHA256 MQCD_VERSION_11 -er "C=AU, ST=Sydney, O=Pulsar Integration PL81NA Inc., CN=www.sd.pulsarintegration.PL81N.com"
*Option descriptions
MQGMO_WAIT: Set MQGMO_WAIT in MQGMO.Options.
MQWI_UNLIMITED: Set MQGMO.WaitInterval to MQWI_UNLIMITED.
-x: Specify the connection name in MQCD.ConnectionName.
-ch: Specify the channel name in MQCD.ChannelName.
-cl: Specify the certificate label in MQCD.CertificateLabel.
-cs: Specify SSL/TLS CipherSpec in MQCD.SSLCipherSpec.
MQCD_VERSION_11: Specify MQCD_VERSION_11 for MQCD.Version.
-er: Set MQCD.SSLPeerNamePtr to reference to DN and MQCD.SSLPeerNamePtr to length of DN.
You can connect without any problem.
$ mqpcf chs -qm PL81N -c PL81N.MQICHL SSLPEER
1: CHANNEL(PL81N.MQICHL) CHLTYPE(SVRCONN) CONNAME(xxx.xxx.xxx.xxx) CHLINSTYPE(CURRENT) SSLPEER(SERIALNUMBER=02,CN=www.pulsarintegration.PL921WC.com,O=Pulsar Integration PL921WC Inc.,ST=Chiba,C=JP) STATUS(RUNNING) STOPREQ(NO) SUBSTATE(RECEIVE) RAPPLTAG(C:\...\mqpgfc.exe)
Try setting a DN "C=US, ST=New York" that is different from the server-side certificate by the client application(mqpgfc).
>mqpgfc -qm PL81N -q LQ1 MQGMO_WAIT MQWI_UNLIMITED -x xxx.xxx.xxx.xxx(xxxx) -ch PL81N.MQICHL -cl PL921WCA -cs TLS_AES_128_GCM_SHA256 MQCD_VERSION_11 -er "C=US, ST=New York" MQCONNX fail : PL81N CompCd=02 ReasonCd=2393 !!! Queue Manager Connect Fail PL81N !!! >mqrc 2393 2393 0x00000959 MQRC_SSL_INITIALIZATION_ERROR
In the client-side error log, you will see an error message explaining that the connection failed due to an SSLPEER DN mismatch.
AMQ9636E: SSL distinguished name does not match peer name, channel 'PL81N.MQICHL'. EXPLANATION: The distinguished name, 'SERIALNUMBER=01,CN=www.sd.pulsarintegration.PL81N.com,O=Pulsar Integration PL81NA Inc.,ST=Sydney,C=AU', contained in the SSL certificate for the remote end of the channel does not match the local SSL peer name for channel 'PL81N.MQICHL'. The distinguished name at the remote host 'xxx.xxx.xxx.xxx(xxxx)' must match the peer name specified (which can be generic) before the channel can be started.
This concludes the basic server-to-server connection using SSL/TLS and how to set up and verify the client connection. Please try different patterns.